I found this post that is being passed around on Facebook and the internet. I do not know who wrote it or who to give credit to.
TIPS ON PUMPING GAS
I don't know what you guys are paying for gasoline.... but here in California we are paying up to $3.75 to $4.10 ...per gallon. My line of work is in petroleum for about 31 years now, so here are some tricks to get more of your money's worth for every gallon:
Here at the Kinder Morgan Pipeline where I work in San Jose , CA we deliver about 4 million gallons in a 24-hour period thru the pipeline.. One day is diesel the next day is jet fuel, and gasoline, regular and premium grades. We have 34-storage tanks here with a total capacity of 16,800,000 gallons.
Only buy or fill up your car or truck in the early morning when the ground temperature is still cold. Remember that all service stations have their storage tanks buried below ground. The colder the ground the more dense the gasoline, when it gets warmer gasoline expands, so buying in the afternoon or in the evening....your gallon is not exactly a gallon. In the petroleum business, the specific gravity and the temperature of the gasoline, diesel and jet fuel, ethanol and other petroleum products plays an important role.
A 1-degree rise in temperature is a big deal for this business. But the service stations do not have temperature compensation at the pumps.
When you're filling up do not squeeze the trigger of the nozzle to a fast mode If you look you will see that the trigger has three (3) stages: low, middle, and high. You should be pumping on low mode, thereby minimizing the vapors that are created while you are pumping. All hoses at the pump have a vapor return. If you are pumping on the fast rate, some of the liquid that goes to your tank becomes vapor. Those vapors are being sucked up and back into the underground storage tank so you're getting less worth for your money.
One of the most important tips is to fill up when your gas tank is HALF FULL. The reason for this is the more gas you have in your tank the less air occupying its empty space. Gasoline evaporates faster than you can imagine. Gasoline storage tanks have an internal floating roof. This roof serves as zero clearance between the gas and the atmosphere, so it minimizes the evaporation. Unlike service stations, here where I work, every truck that we load is temperature compensated so that every gallon is actually the exact amount.
Another reminder, if there is a gasoline truck pumping into the storage tanks when you stop to buy gas, DO NOT fill up; most likely the gasoline is being stirred up as the gas is being delivered, and you might pick up some of the dirt that normally settles on the bottom.
Saturday, March 30, 2013
Friday, March 29, 2013
How To Deodorize and Sharpen Your Disposal Naturally
How To Deodorize and Sharpen Your Disposal Naturally
By StockpilingMoms - Blogger
By StockpilingMoms - Blogger
 How To Deodorize and Sharpen Your Disposal Naturally
Friday, March 22, 2013
Macaroni & Cheese Salad Recipe
Macaroni & Cheese Salad Recipe
By CookEatShare Cookbook
- 1 box Macaroni and Cheese Dinner
- 3 hard boiled Large eggs
- 3 teaspoon sweet pickle relish
- 1/2 teaspoon prepared mustard
- 1/2 teaspoon celery seed
- 1/4 teaspoon sweet basil
- 1/8 teaspoon thyme
- Salt to taste
- 1/2 c. mayonnaise
Directions
- Prepare macaroni and cheese as directed on box and cold. Mix remaining ingredients with cooked dinner. Refrigerateand serve.
Mac And Cheese Beef Pot Pie Recipe
Mac And Cheese Beef Pot Pie Recipe
By CookEatShare Cookbook
Cost per recipe $10.21
- 2 frzn pie crusts
- 1 box macaroni and cheese
- 1/4 c. lowfat milk (or possibly to taste)
- 1/4 c. butter (or possibly to taste)
- 19 ounce can chunky beef soup or possibly stew
- 1 c. shredded cheddar cheese (optional)
Directions
- Home made pot pie has never been so easy! And the flavorful mac and cheese topping adds another dimension to this dish. The basic recipe makes 2 individually sized pot pies - sufficient for 2 big eaters, or possibly 4 smaller appetites. It's not hard - really, it's not!
- Preheat oven to 350°F.Thaw pie crusts 15 min. Make the macaroni and cheese according to box directions, or possibly your favorite variation.
- While macaroni is cooking, heat soup in a saucepan. After thawing shells, press each carefully into an individual size oven-proof bowl or possibly soufflé pan, smoothing it out and patching any cracks.
- Cut off excess around edges. Pour soup into pie shell.
- Carefully place spoonfuls of macaroni and cheese on top of pie, covering it evenly. Scatter cheddar cheese on top of the pie.
- Bake 35 min, or possibly till cheese is melted and starting to brown.
- Chicken or possibly turkey pot pie: Substitute a different filling. You can use any thick and chunky style canned soup or possibly stew.Thicker filling: If you prefer a thicker filling, there are two approaches. A) Boil the soup over low heat to reduce it, stirring occasionally. B) Use a slotted spoon to put the soup chunks into the pie crusts. Cover with as much of the sauce as you like.
- Family size pot pie: Use one deep dish pie crust and make a 9" pie. Follow rest of recipe as normal.
- Added top crust: Use a second frzn pie shell for the top crust. Let it thaw 15 min, roll it to flatten, place on top of the filled pie, and crimp edges to seal. Cut slits in the top crust, and brush with lightly beaten egg white before baking.
- Serves 2 to 4.
Meaty Macaroni and Cheese
Meaty Macaroni and Cheese

When I think about, if I could replicate a non-processed macaroni and cheese to taste like the box stuff my kids love so much, I could really have an organic meal on my hands. However, I haven’t made a fresh macaroni and cheese recipe, yet, that my kids will award the Kid Seal of Approval. Oh sure, I’ve made some incredible tasting recipes loved by adults but the kids are…well, their kids.
In the meantime, start a medium saucepan of water to boil the macaroni. When the water comes to a boil, add the dried macaroni. Stir pasta, reduce heat to medium and cook for 8 minutes, until the pasta is tender to the bite. Drain off water. Add powdered cheese and warmed milk to pasta . Stir until smooth and creamy. It may look a little soupy but don’t worry. The milk makes it easier to reheat as a leftover.
Once the meat is fully cooked, add the drained tomatoes, and black eye peas. Season with salt and pepper to taste. Continue to cook until the tomatoes and peas are heated through.
Now as for serving, you could lay a bed of cheesy macaroni in the bowl first and top it with the meaty mixture, as shown in the photo above. Or you can toss the pasta together with the meaty mixture and serve it up like a goulash. Either way, it tastes great.
This is a very good make-ahead-meal recipe for work lunches.
When I think about, if I could replicate a non-processed macaroni and cheese to taste like the box stuff my kids love so much, I could really have an organic meal on my hands. However, I haven’t made a fresh macaroni and cheese recipe, yet, that my kids will award the Kid Seal of Approval. Oh sure, I’ve made some incredible tasting recipes loved by adults but the kids are…well, their kids.
HERE’S ALL IT TAKES
to feed a family of 4- 1/2 pound fresh, lean ground beef or pork
- 1 small yellow onion, finely chopped
- 6 to 8 whole garlic cloves
- 1/2 teaspoon Mexican oregano
- 1/4 teaspoon dried rubbed Sage
- 1 regular box macaroni and cheese
- 1 cup fresh, whole milk, warmed
- 1 (14 ounce) can diced tomatoes, drained
- 1 (14 ounce) can black eye peas OR black beans, drained
In the meantime, start a medium saucepan of water to boil the macaroni. When the water comes to a boil, add the dried macaroni. Stir pasta, reduce heat to medium and cook for 8 minutes, until the pasta is tender to the bite. Drain off water. Add powdered cheese and warmed milk to pasta . Stir until smooth and creamy. It may look a little soupy but don’t worry. The milk makes it easier to reheat as a leftover.
Once the meat is fully cooked, add the drained tomatoes, and black eye peas. Season with salt and pepper to taste. Continue to cook until the tomatoes and peas are heated through.
Now as for serving, you could lay a bed of cheesy macaroni in the bowl first and top it with the meaty mixture, as shown in the photo above. Or you can toss the pasta together with the meaty mixture and serve it up like a goulash. Either way, it tastes great.
This is a very good make-ahead-meal recipe for work lunches.
Mac And Cheese With Tuna Recipe
Mac And Cheese With Tuna Recipe
Cost per recipe $1.68
- 1 box macaroni and cheese
- 1/4 stick of butter
- 1 healthy pinch of pepper
- 1/4 teaspoon salt
- 1/2 c. lowfat milk
- 1 sm. can tuna, liquid removed
Directions
- Follow directions in cooking macaroni, drain. Add in lowfat milk, butter, pepper, salt, and package of cheese. Heat over medium heat. Add in tuna and stir. Heat till it comes to a boil and serve.
Dressed Up Macaroni and Cheese
Dressed Up Macaroni and Cheese
This delicious recipe is a great way to feed three people for just 63 cents a serving.

Prep Time: 5 minutes
Cook Time: 10 minutes
Total Time: 15 minutes
Ingredients:
- 2 tablespoons butter or rmargarine
- 1/2 cup chopped onion
- 1 (5.5-ounce) box macaroni and cheese mix
- 1/3 cup milk
- 1-2 tablespoons mustard or ranch salad dressing
- 1 cup frozen peas, thawed and drained or 1/4 cup grated Parmesan cheese
Preparation:
In medium saucepan, melt butter over medium heat. Add onion; cook and stir until tender, about 5 minutes.Meanwhile, bring a large pot of water to a boil. Add macaroni from package and cook according to package directions until al dente. Drain macaroni and return to pot. Stir in powdered mix from package, cooked onions with butter, milk, mustard or salad dressing, and peas, if using, and stir until sauce is creamy and mixture is hot. Top with grated Parmesan cheese and serve immediately. Serves 3 for 63 cents a serving.From The Everything Meals on a Budget Cookbook, copyright 2008, F+W Publications, Inc. All rights reserved
Beef And Mushroom Macaroni And Cheese Recipe
Beef And Mushroom Macaroni And Cheese Recipe
- 1 box Macaroni and Cheese
- 1 can Cream of Mushroom soup
- 1 lb grnd beef
- Shredded Cheddar cheese.
- Cook the macaroni and cheese according to package directions, add in shredded cheddar cheese (I use 1/2 c.) Brown the grnd beef and drain. After mixing the macaroni and cheese, add in the grnd beef and the mushroom soup and mix well.
Directions
The ingredients have been scaled to 1 servings.
These directions are for 1 servings.
Tuesday, March 19, 2013
Breakfast Cookies
Breakfast Cookies
3 mashed bananas (ripe)
1/3 cup apple sauce
2 cups uncooked quick-cooking oats
1/4 cup skim milk
1/2 cup raisins (or any other dried fruit you want to add)
1 tsp vanilla
1 tsp cinnamon
1 tbsp Splenda , sugar or other sweetener.
Preheat oven to 350 degrees. Mix all ingredients in a bowl really well. Let this mixture stand for at least 5 minutes to let the oats become good and hydrated. Heap the dough by teaspoonfuls onto a greased cookie sheet. Bake for 15-20 minutes and let cool.
Variations: If you add some chopped nuts, you have a grab and go breakfast that includes protein as well as fruits and grains. Dried cranberries are also a great addition if you don't care for raisins, which some people don't. Cardamom fans may want to substitute that spice for the cinnamon.
You can make a huge batch of these and then freeze some, leaving a few to be snagged each morning while you and your other family members are on the way out the door.
It's important to note that this is not a dessert type of cookie, so it will not be what you are used to eating when you think cookie. These are also very moist, due to both mashed bananas and apple sauce being included. It's basically oatmeal with add-ins for breakfast that you can eat from your hand.
By Myscha Theriault
Saturday, March 9, 2013
ONION SOUP MIX RECIPE
RECIPE FOR DRY ONION SOUP MIX
3/4 cup onion flakes, chopped
1/4 cup onion powder
1/4 cup beef bouillon powder (put cubes in blender to make powder)
2 TBS brown gravy mix
1/2 tsp garlic powder
1 tsp freshly ground black pepper
1 tsp regular black pepper
1 tsp white sugar
Place all ingredients in a resealable bag and shake well to combine. Pour into an airtight container and refrigerate until using. Shake before measuring out for cooking.
5 tablespoons = 1 dry onion soup pack
http://www.misshomemade.com
HOMEMADE SEASONED SALT RECIPE
HOMEMADE SEASONED SALT
You are on your way to saving a lot of money when you make your own spice mixes. You can customize this recipe to your own taste.
2 tsp salt (optional)
2 tsp white sugar
1/2 tsp paprika
1/2 tsp onion powder
1/2 tsp garlic powder
1/4 tsp turmeric
1/8 tsp flour
Shake all ingredients in a resealable bag and store in an airtight container.
http://www.misshomemade.com
HOW TO MAKE GARLIC POWDER

Peel the garlic cloves and cut them into thin pieces. Place on a baking sheet in a 150 degree oven or use a food dehydrator; turning often.
Grind the dried pieces in a blender and sift the material in a strainer to separate the chunks from the fine powder. The chunks are excellent on pizza or in sauce, by the way.
Store the chunks and powder in airtight containers, or freeze for long-time storage.
http://www.misshomemade.com
Frugal Meals From Frugal Sally Readers
From Melissa Smith-
Cheap meals - 3 chicken breasts + 1 jar of salsa in crockpot. Cook on low for 4-6 hours (or longer) then shred with fork. Serve with favorite taco fixings. Take leftover chicken, mix with 6-8 servings of cooked white rice, 1/3 bag frozen corn, and left over hot taco fixings from previous night (onions, peppers, beans, etc). Add cheese to make a second meal. Or take leftover chicken, mix with 1 drained can black beans, 1 drained can whole kernel corn (I sub frozen), and more salsa. Let combine overnight in fridge. Serve with lettuce, cheese & tomato.
Cheap meals - 3 chicken breasts + 1 jar of salsa in crockpot. Cook on low for 4-6 hours (or longer) then shred with fork. Serve with favorite taco fixings. Take leftover chicken, mix with 6-8 servings of cooked white rice, 1/3 bag frozen corn, and left over hot taco fixings from previous night (onions, peppers, beans, etc). Add cheese to make a second meal. Or take leftover chicken, mix with 1 drained can black beans, 1 drained can whole kernel corn (I sub frozen), and more salsa. Let combine overnight in fridge. Serve with lettuce, cheese & tomato.
From CiCi McBride
From Christy Parsons Rowe
Mac & Cheese soup (I used different veggies and sometimes add bacon bits etc; many ways to change this up!)
2 1/2 cups water
1 pkg frozen peas and carrots, thawed
1 pkg macaroni and cheese mix
1 1/2 tsp salt
1/2 tsp pepper
4 cups milk
1 cup shredded sharp cheddar
make it In soup pot, bring water to boil over high heat. Stir in peas and carrots, macaroni (reserve cheese packet), salt and pepper. Return to boil, cover loosely and cook for 5 min. Add remaining ingredients, including cheese packet. Reduce heat to medium, cover loosely. Simmer for 10 minutes or until hot and creamy, stirring occasionally.
From Donna Zalensas Jones
I was trying to think of what pantry staples we make. Then it dawned on me that we make taco seasoning most of the time because the price crept up to where I don't think it's worth it for the store-bought version.
This taco seasoning recipe is tweaked from a recipe that we found online, so it's not as spicy and has more cumin, which we really like. I don't bother making enough to store and just make it on the fly as we need it (it takes me about 1 minute to measure everything out and dump it in the frying pan with the browned meat). The recipe is easily doubled. I use a batch on 1 to 1-1/2 pounds of ground beef or turkey.
1 tablespoon ground cumin
2-3 teaspoons chili powder
1 teaspoon Kosher salt
1/2 teaspoon paprika
1/2 teaspoon black pepper
1/4 teaspoon garlic powder
1/4 teaspoon onion powder (or 1/2 teaspoon dried minced onions)
1/4 teaspoon dried oregano
1/4 teaspoon crushed red pepper flakes (optional)
I've started buying many of my spices in bulk from an Amish store. When you see a price per pound of $5 or more, you might think it's cheaper to buy it in the 99-cent version at the grocery store, but it's usually not (unless you're buying it to have the container to reuse). Those bottles usually hold only an ounce or two. You have to do the math.
From Elizabeth Sciberras Stalzer
hope you like it.....http://www.groovinmoms.com/?p=277

www.groovinmoms.com
2 3/4 cups water 1 1/2 cups uncooked long-grain white rice, rinsed, drained 1/4 teaspoon salt 5 tablespoons grapeseed oil, divided 2 large eggs, beaten to blend 4 small carrots (about 4 ounces total), peeled and finely diced 1 cup broccoli florets, cut into small pieces 3 green onions; white parts t...
Wednesday, March 6, 2013
Tips to Save Money on Baby From Frugal Sally Readers
Here are some tips that Frugal Sally Readers sent in to help save money on babies and toddlers.
From Diane M. B.
A clean t-shirt of daddys put on over baby after you have dressed them will keep them ''clean'' until the special time arrives ...works wonders !!!!! i raised 8 children..
From Sharon S.
I got a food mincer thing that minced up food like steak, etc up to baby food mixture. It took everything, fruit,veg, meat, and saved me a fortune in baby food, plus you don't have to wean them off commercial baby food onto proper food. Also cloth diapers saved a fortune too. Hand-me-down clothes where possible, hand-me-down toys, not wearing shoes until she could actually walk! Basically, I'm as frugal as i can be! Avoid plastic toys if possible, go for wood. They last years longer. And avoid the 'current must-have'. Within 1 year, they will have grown out of whatever it is and be into something else. There is time enough for all that when they reach 6-7 yrs and get into something that will last a few years. Paint the nursery a neutral colour. You can use posters to bring colour and whatever the current trend is into the room. I also didn't use a moses basket and went straight to a cot, then out of a cot into a single bed (avoiding a cot bed, you have to get a single bed eventually anyway). You only need 1-2 outfits for the first 3 months for going out. Use babygrows the rest of the time. They are much cheaper.
From Traci L. T.
What helped us with our long skinny baby was getting onesies with an extra row of snaps. He was able to wear them much longer
From Amanda P.
If people offer you clothes, take them! You can 'shop' through hand-me downs. If something is not your taste, you can pass along to someone else or to an organization such as the Salvation Army. Even if it nets you just a few pieces, it's worth going through! (Do throw away stained items, and also don't pass along stained things. It isn't frugal to give folks your yucky stuff- it's a time waster for everyone, and it is tacky!)
From Teri H.
My friend has twins and makes her own baby wipes. 1 tbsp baby oil and 1 tbsp baby liquidsoap mixed with 2 cups water. She uses the heavy duty napkins that are the Walmart brand, she folds them in half puts them in a tub used for wipes and pours the water mixture over them! They are awesome!
From Cyndi S. K.
Corn starch when changing a diaper is cheaper than powder and prevents diaper rash.
From Molly T.
Don't buy too much. They outgrow toys and clothes fast. Just buy in stages as needed.
From Susan Knows-Best
Make your own baby food and fruit juices, much cheaper.
From Lynne G. T.
Blend all your babyfood. When making your own meal, cook just a little extra without the spices, blend with water to puree it, and then add some instant potatoes to get to the constituancy that you want it. Depending on how much your baby eats, freeze it in either ice cube trays or little containers. I found that using the instant potatoes, you can freeze them and they are much better than using the real potato. Works wonders and is so much cheaper
I make my grandson's food and drink the same way I did my own kids 20 odd years ago. If money is tight you can use take a few apples or pears, and make enough food, drink and icepops for a week or more. I don't waste anything. Once I've boiled oranges to make orange flavored water, I take the skin and either save it towards future marmalade or put it in a mason jar with white vinegar for cleaning. I can make a couple of gallons of baby juice for less than the price of one shop bought bottle. Save the fruit after with a little of the cooled juice, add it to custard for baby desserts. There's a lot of ways for young parents to cut costs.
From Natalia V. M. M.
From Nicole R.
From Diane M. B.
A clean t-shirt of daddys put on over baby after you have dressed them will keep them ''clean'' until the special time arrives ...works wonders !!!!! i raised 8 children..
From Sharon S.
I got a food mincer thing that minced up food like steak, etc up to baby food mixture. It took everything, fruit,veg, meat, and saved me a fortune in baby food, plus you don't have to wean them off commercial baby food onto proper food. Also cloth diapers saved a fortune too. Hand-me-down clothes where possible, hand-me-down toys, not wearing shoes until she could actually walk! Basically, I'm as frugal as i can be! Avoid plastic toys if possible, go for wood. They last years longer. And avoid the 'current must-have'. Within 1 year, they will have grown out of whatever it is and be into something else. There is time enough for all that when they reach 6-7 yrs and get into something that will last a few years. Paint the nursery a neutral colour. You can use posters to bring colour and whatever the current trend is into the room. I also didn't use a moses basket and went straight to a cot, then out of a cot into a single bed (avoiding a cot bed, you have to get a single bed eventually anyway). You only need 1-2 outfits for the first 3 months for going out. Use babygrows the rest of the time. They are much cheaper.
From Traci L. T.
What helped us with our long skinny baby was getting onesies with an extra row of snaps. He was able to wear them much longer
From Amanda P.
If people offer you clothes, take them! You can 'shop' through hand-me downs. If something is not your taste, you can pass along to someone else or to an organization such as the Salvation Army. Even if it nets you just a few pieces, it's worth going through! (Do throw away stained items, and also don't pass along stained things. It isn't frugal to give folks your yucky stuff- it's a time waster for everyone, and it is tacky!)
From Teri H.
My friend has twins and makes her own baby wipes. 1 tbsp baby oil and 1 tbsp baby liquidsoap mixed with 2 cups water. She uses the heavy duty napkins that are the Walmart brand, she folds them in half puts them in a tub used for wipes and pours the water mixture over them! They are awesome!
From Cyndi S. K.
Corn starch when changing a diaper is cheaper than powder and prevents diaper rash.
From Molly T.
Don't buy too much. They outgrow toys and clothes fast. Just buy in stages as needed.
From Susan Knows-Best
Make your own baby food and fruit juices, much cheaper.
From Lynne G. T.
Blend all your babyfood. When making your own meal, cook just a little extra without the spices, blend with water to puree it, and then add some instant potatoes to get to the constituancy that you want it. Depending on how much your baby eats, freeze it in either ice cube trays or little containers. I found that using the instant potatoes, you can freeze them and they are much better than using the real potato. Works wonders and is so much cheaper
I make my grandson's food and drink the same way I did my own kids 20 odd years ago. If money is tight you can use take a few apples or pears, and make enough food, drink and icepops for a week or more. I don't waste anything. Once I've boiled oranges to make orange flavored water, I take the skin and either save it towards future marmalade or put it in a mason jar with white vinegar for cleaning. I can make a couple of gallons of baby juice for less than the price of one shop bought bottle. Save the fruit after with a little of the cooled juice, add it to custard for baby desserts. There's a lot of ways for young parents to cut costs.
From Natalia V. M. M.
Thrift shops!!! They go through clothes like theres no tommorow, and honestly ..is there really a need for a baby to have 5 pairs or sneakers?
Ice cube trays are awesome as they waste less food and you defrost as many or as few cubes as they will take at the time
From Michael R.
If u r formula feeding sign up and have family members sign up with the brand. We received many containers of formula and 5$ coupons from Simulac.
From Regina C. P.
I think using those little diaper holders and using clothe diapers would save lots of money-not sure what they're called, I wish they were around when my babies were babies
From Stacey L. M.
Shopping thrift stores and consignment sales for everything from clothes to toys swings high chairs etc there is no need in buying new they outgrow it very quickly
From Renee W-W.
Breast feed if you possibly can. It's free and specifically made for your baby.
From Debbie R. M.
Garage sales are a great way to find anything baby...from cribs to clothes to swings, toys, etc. Also, with a newborn, or very young baby, when they are colicky, running a vacuum cleaner will put a screaming baby to sleep...fast.
From Nicole R.

Cradle Cap Remedies
Cradle Cap
All of my babies have had cradle cap, but I didn’t worry about it with my first two babes because they had so much hair that it was hardly noticeable. Blair is a bald baby, so the cradle cap shows pretty badly on her little head. Cradle cap doesn’t hurt anything, but it can be an unattractive on a baby. I’ve found a simple solution that works well for both removing cradle cap and for keeping it from returning.
When you are giving your baby a bath in the evening, rub a small amount of coconut oil onto their head and then use one of the soft bristled baby brushes to gently rub their head in a circular motion for a few minutes to help loosen and remove the cradle cap. Then rinse their head and wash with a natural baby shampoo.
After they’re out of the bath, massage more coconut oil into their head where the cradle cap is. Their little head will look greasy and shiny, but leave the coconut oil on through the night.
Then in the morning gently wash their hair and head again with the natural baby shampoo. The cradle cap should be mostly gone and will stay away for several weeks. If you notice it returning, you can try rubbing in some coconut oil overnight, but if that doesn’t work, you can use the bath and baby brush treatment to help remove it again.
The post is from Emily of Live Renewed
Diaper Rash Remedies
Diaper Rash Remedies
Every baby is going to battle diaper rash at some point, and you don’t have to resort to using that stinky white cream that feels like you can never wash off your hands.
Unrefined coconut oil is a super easy diaper rash cream. Coconut oil has natural anti-bacterial and anti-fungal properties, so it will help to heal up the rash, and protect the skin at the same time. If you use cloth diapers you’ll want to be careful about using coconut oil though, because it could cause oily build-up on the diapers and make them repel. Your best bet is to use a liner to keep the coconut oil off of the cloth diaper.
Also, diluted Apple Cider Vinegar can be used to heal diaper rash. You can mix about a teaspoon of ACV with a half cup of water in a little bowl and then dip a washcloth in the mixture and lightly pat it onto your baby’s bum. Apple Cider Vinegar also has anti-bacterial qualities that help to fight diaper rash, but be aware that it may sting when you put it on your baby’s skin, if the rash is severe.
Finally, air and sunshine speed up the healing of a diaper rash. When the weather was nice I would sit outside with Blair in my lap on a prefold cloth diaper, just in case, with the sun shining on her bum. Diaper rash thrives in dark and moist areas, so if you can increase air circulation and expose the area to light, that will help the skin to heal more quickly.
The post is from Emily of Live Renewed
Colic and Teething
Colic and Teething
Chamomile Tea is known for helping to soothe and calm babies who are fussy and upset from colic, gas pains, and teething. Choose tea from a trusted source (I use Traditional Medicinals), and brew it as you would normally brew a cup of tea, but then dilute it 1:1 with filtered water, or brew it diluted by using one tea bag for 16 oz. of water.Give 1/2 oz of tea to your baby using a dropper, or mix it in a bottle of breast milk or formula. If you’re breastfeeding you can also drink the tea (undiluted), and your baby will reap some of the benefits through your breast milk.
For Teething -
For teething discomfort, soak the corner of a washcloth in the undiluted Chamomile tea and place it in the freezer. Let your baby chew on the frozen washcloth to soothe them and ease their teething pain.
The post is from Emily of Live Renewed
Sunday, March 3, 2013
Homemade Mouthwash
Baking Soda Mouthwash for Fresh Breath:-
Combine 3 ounces of water, ½ teaspoon of baking soda, 2 drop of pure peppermint oil, and 2 drop of tea tree oil. Mix ingredients together in reusable container
Benefits of Using Baking Soda Mouthwash:
Combine 3 ounces of water, ½ teaspoon of baking soda, 2 drop of pure peppermint oil, and 2 drop of tea tree oil. Mix ingredients together in reusable container
Benefits of Using Baking Soda Mouthwash:
- Reasonably priced
- No harsh chemicals
- No strong taste
- Anti-alcohol
Hand & Foot Sea Salt Scrub
Hand & Foot Sea Salt Scrub
http://www.ehow.com
Instructions
- Measure out 16 oz. of sea salt into a mixing bowl. It is best if the bowl is not metallic to ensure there is no type of reaction.
- Add 15 drops of the main essential oil scent you want to use to the sea salt in the bowl. Starting with 15 drops ensures you do not overscent the salts. If it smells weak, feel free to add up to another 15 drops.
Thoroughly mix the sea salt with the essential oil. Add other oil scents, if desired. Thoroughly mix in each scent. Mix and match the smells until you like the way the blend smells.
Store the blend in glass jars with tight-fitting lids.
Tips & Warnings
- If you find that you have added too many essential oils, mix in 1/2 cup of sea salt. Continue to add sea salt as needed, mixing after each addition.
- Be sure to keep track of the amount of drops of which scents you use for future scrub mixes.
- For use in a bath, add about 1/3 cup to the bath water. If using as a scrub for hands and feet, scoop out 1 tbsp., place in the center of a wash cloth and wet. Thoroughly scrub hands and feet, making sure to thoroughly rinse when finished.
- If you would like to make a relaxing scrub, use lavender essential oil. For an energizing scrub, use 10 drops of spearmint with five drops of rosemary essential oil. Combining five drops of eucalyptus with 15 drops of lavender essential oil makes a very good muscle relaxing scrub. The possibilities are endless.
http://www.ehow.com
How To Make Vaseline
Homemade Vaseline
It's easy peasy~cause that's how I roll!
Simply put the olive oil and the beeswax into a glass measuring cup and place into a double-broiler. Melt the beeswax slowly, stirring periodically.
Thank you to http://www.easy-home-made.com for this recipe.
It's easy peasy~cause that's how I roll!
I strongly recommend that you NOT buy the beeswax in a big chunk.---->
Grating beeswax with a cheese grater is "no bueno!" It comes in little pellets and would make this experience much quicker and more enjoyable!
|  |
Thank you to http://www.easy-home-made.com for this recipe.
Saturday, March 2, 2013
Strawberry Face Mask
Strawberry Face Mask
STEP 2. In another bowl, mash the strawberries to a pulp
STEP 3. Mix both the cream, strawberries and honey together
STEP 4. Using immediately, spread a thin layer over your entire face, neck and shoulder area.
STEP 5. Relax and leave the mask on for at least 20 - 30 minutes.
- 5 tablespoons of thick cream or 1 large egg white
- 3 strawberries
- 1 teaspoon of honey
STEP 2. In another bowl, mash the strawberries to a pulp
STEP 3. Mix both the cream, strawberries and honey together
STEP 4. Using immediately, spread a thin layer over your entire face, neck and shoulder area.
STEP 5. Relax and leave the mask on for at least 20 - 30 minutes.
Homemade Toothpaste Recipe – Easy and Frugal
Homemade Toothpaste Recipe – Easy and Frugal
From http://www.diynatural.com
SIMPLE INGREDIENTS
Prior to making our own, we were using Tom’s of Maine Spearmint Gel® costing an average of $5.00 for a 5.2oz tube. Based on the calculations above the same amount of my homemade toothpaste will cost me between $0.91 and $1.43 for 5.33oz, depending on how much flavoring I use.
1. Start with these ingredients:
2. Mix together and add water until paste reaches desired consistency.
From http://www.diynatural.com
SIMPLE INGREDIENTS
- 2/3 cup baking soda
- 4 tsp fine sea salt (optional – gives paste extra scrubbing power, but is okay to leave out if the taste is too salty)
- 1 – 2 tsp peppermint extract or 10-15 drops peppermint essential oil (or add your favorite flavor – spearmint, orange, etc.)
- water (add to desired consistency)
COST BREAKDOWN & SAVINGS
Here is the breakdown in cost analysis for 5.33oz of my homemade toothpaste (same amount as one tube of my old toothpaste):- baking soda @ 16oz = $1.00 | 2/3 cup is 5.33oz which = $0.33
- fine sea salt @ 22oz = $2.00 | 4tsp is .66oz which = $0.06
- peppermint extract @ 1oz = $3.00 | 2tsp is .33oz which = $1.04 | Better yet, use 1tsp is .17oz which = $0.52
Prior to making our own, we were using Tom’s of Maine Spearmint Gel® costing an average of $5.00 for a 5.2oz tube. Based on the calculations above the same amount of my homemade toothpaste will cost me between $0.91 and $1.43 for 5.33oz, depending on how much flavoring I use.
The cost savings will be between $4.09 – $3.57 per tube!
Aside from cost, there are many other benefits of homemade products. By making this toothpaste not only are we cutting costs by upwards of 300%, we also know the exact ingredients and count time spent as fun, educational, and useful for all involvedA SIMPLE RECIPE & MAKING OF A BATCH
Remember, each batch yields the equivalent of one 5.3oz tube of toothpaste which you can store in a small storage container somewhere close to your toothbrush. When you are ready to brush, simply wet your toothbrush, scoop or spread as much paste as you like, and begin brushing.**Update** If you are grossed out by double-dipping with others but don’t want to make separate batches – do as DFA reader Lakita of Paneh Praise suggests – put the paste in a Ziploc bag and cut the corner off for a homemade squeezable tube. Thanks Lakita!
1. Start with these ingredients:

2. Mix together and add water until paste reaches desired consistency.

That’s it! You’re done. Now go get rid of that bad breath!
How to Make Wool Dryer Balls
How to Make Wool Dryer Balls
Click on this link to go to the instructions - http://www.diynatural.com/how-to-make-wool-dryer-balls/
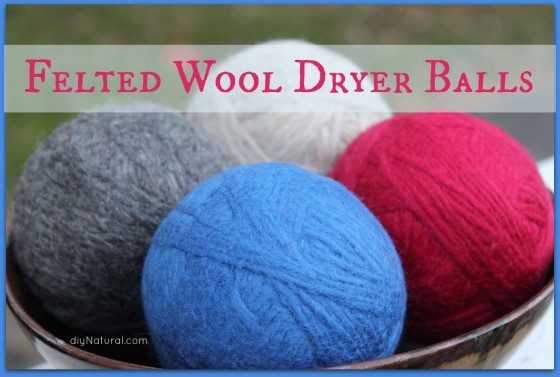
Click on this link to go to the instructions - http://www.diynatural.com/how-to-make-wool-dryer-balls/
Homemade Shout Pre-treater
Homemade Shout Pre-treater
(Makes about 30 fl oz)
(Makes about 30 fl oz)
2/3 C Dawn dish detergent
2/3 C ammonia
6 Tb baking soda
2 C warm water
1. Mix together all the ingredients in a medium bowl. Using a funnel, pour into an old Shout bottle or other spray bottle.
2. To use, shake the bottle well because the baking soda does settle to the bottom. Spray as you normally would on a stain then launder. Do not use on anything that will be washed with chlorine bleach due to the ammonia!


Citrus Window Cleaner Recipe
Citrus Window Cleaner Recipe
Mix the following ingredients and pour into a spray bottle.
Mix the following ingredients and pour into a spray bottle.
- 1 C rubbing alcohol
- 1 C white vinegar
- 2Tbsp cornstarch
- 3 C water
- Orange & Lemon peels
Place the citrus peels into the vinegar & water mixture and let it infuse for a week. Then pour the mixture into a spray bottle with the rubbing alcohol and cornstarch.
This recipe can also be used effectively on Tile Floors & Hard Surfaces
Basic Homemade Laundry Soap
Basic Homemade Laundry Soap
It's pretty easy to make and quite effective. All of the ingredients can be found in the detergent aisle at a Wal-mart except the Baking Soda (4 pound box) is found in the baking section. This recipe contains all of the major players that we use in our environmentally friendly cleaning products.
Step #2 – Pour all of the dry ingredients into a large container. I used a 5 gallon bucket and alternated the dry ingredients and the soap pieces. Now all you have to do is stir!
Step #3 –It's optional to add Essential Oil but I love the various essential oils recipes. Try 25 drops of the following or mix them up to make your favorite essential oils recipes!
I use one scoop that you get in the OxyClean container per load. Yep, that's all you need.
This is a slightly revised version of a recipe that is on www.easy-home-made.com
It's pretty easy to make and quite effective. All of the ingredients can be found in the detergent aisle at a Wal-mart except the Baking Soda (4 pound box) is found in the baking section. This recipe contains all of the major players that we use in our environmentally friendly cleaning products.
- 1 4 lb 12 oz box Borax
- 1 4 lb box Baking Soda
- 1 55 oz box Washing Soda
- 3 bars of Fels-Naptha soap or 2 bars of Zote (you can use an alternative type of bar soap)
- 2 small containers of Oxy Clean (purchased at the Dollar Store)
Step #2 – Pour all of the dry ingredients into a large container. I used a 5 gallon bucket and alternated the dry ingredients and the soap pieces. Now all you have to do is stir!
Step #3 –It's optional to add Essential Oil but I love the various essential oils recipes. Try 25 drops of the following or mix them up to make your favorite essential oils recipes!
- Lavender
- Lemon
- Melaleuca
- Grapefruit
I use one scoop that you get in the OxyClean container per load. Yep, that's all you need.
This is a slightly revised version of a recipe that is on www.easy-home-made.com
Friday, March 1, 2013
Frugal Childrens Party Ideas
I asked my readers on Frugal Sally to give me their best frugal party tips for children. This is a list of what they came up with.
From Heather O.
Make note books from printer paper and tie off with a ribbon. Also instead of buying crayons break a box up put two in each favor bag with the notebooks.
One more home made bubbles in little bottles from the dollar store or hobby lobby decorate with stickers or ribbon to match your theme.
Homemade play dough on bags, homemade chalk, design your own place mats sorry my mind runs.
From Nancy N. C.
Not sure it's a cost saver but, I guess so since it's definitely portion control ... I know it makes things a lot easier for serving: if you are serving cake and ice cream ... go with cupcakes and pre-scoop ice cream into extra cupcake liners (then set on a baking tray or similar in the freezer 'til time to serve) ... it makes it a lot faster / easier and neater to quickly serve a lot of folks ice cream and cake!
From Marissa M.
Children parties... you could do one child per age of your child... turning 6 equals 6 friends.. this opens your party options up as to where you can have them at without having your child's parents spring for that as well as a gift... Just a thought.
From Jennifer T. C.
This worked for me last year and I am actually having my son bday party today. I made a homemade cake, bought ice cream, a few frozen pizzas, and the boys are going to play outside. This was requested by my son both years. HE didn't want any special party like at the movies, bowling, chuck e cheese etc. All the presents are going to be wrapped in newspaper. Cheap? Maybe but he might remember just running around playing outside when he's older. The only bday parties I ever had as a child were cake and ice cream, presents wrapped in newspaper and family as the attendees.
From Kimberly H. P.
I make home made party decorations. I use napkins n the theme of choice & or posters to make home made piñata. I use a brown grocery bag fill it with McDonald toys & candy then cover it with the napkin or poster. I have a "Pepsi" sign used at a convenience store( the slick kind.) that I recycled and wrote Happy Birthday on the back. We have used that banner for 10 years & 2 kids. It was given to us - we just asked.
From Nicole R.
Kids Birthday parties can be expensive especially if you try to keep up with the Jones next door. So picking a theme that can be done a dime is key. So here a few for you:
1. Science Party- This can be really fun and really cheap. You can decorate your home like a mad scientist with old Halloween decorations. You can have the kids do experiments as games. This website has a ton of them and they usually require things you have right in your home. http://www.sciencekids.co.nz/experiments.html
2. Hero Party- Invite kids to dress as their favorite hero. Make a sign that says welcome to Super hero training camp. Have crafts to make their own masks. Make a bean bag toss hero themed and call it target practice. Take a cardboard box and make a photo booth. For weight lifting take a stick and tape really huge balloons on each end. Print some certificates that say they are officially a super hero.
https://www.facebook.com/LifeOnTheCheap101?ref=hl
From Crystal W-W N.
My daughter's princess party was in our backyard(no rental cost). I picked up a refrigerator box from a furniture store for free and decorated as a castle with my daughter with a draw bridge. Filled up our kiddy pool for water play and played hot potato Snow white style with a poison apple. For lute bags we made crowns out out bristol board and decorated them with sparkle glue and markers as well as decorated dollar store headbands with rhinostones from the dollar store. I made my one ice cream cake with oreo cookie crumb crust, chocolate sauce and ice cream. Our invitations were royal proclamations printed on my computer.
The pirate party we had a treasure hunting game with printed maps that we aged in the oven to find golden coins (chocolate).
For an adventure party, we set up a pup tent (ours was inside because my son's b-day is March) we made hobo loot bags (stick from a nature walk and piece of square material) homemade trail mix (nut free) and little flashlights from the dollar stores. The only thing we slurged on was having someone come in with pets (snakes, turtles, frogs and such to talk about and show the kids) each child got a picture of themselves with a pet as well.
Invites were written on construction paper cut into a leaf.
Barbie party- for the cake I have a large measuring bowl and used it to bake the cake in for barbie's skirt. Stuck one of my daughter's barbies (covered the legs with saran wrap) into the top of the cake and just decorated with icing (koolaid package works very well for icing colouring and flavour, has to be the one without sugar) . We made our own jewelry with beads and ribbon that each child could bring home as well as decorated barrettes from the dollar story. I like to be more crafty with the little thing the kids can bring home. I find the lout bag stuff can sometimes be cheaply made and a lot of money for what you pay for. Usually they last a week then into the garbage. A lot of waste. I would rather the kids be sent home with one thing they made as it is more meaningful and tends to be less likely that it will end up in the trash. The kids spend time making their prize to take home which cuts down on games and prizes as well (some games for parties are expensive especially themed ones).
Thomas the Train party- make shift train from free refridgerator box. ( always call a week in advance to the furniture store to ask for them to save me one). Smaller box for the front and just decorate. Can also work as a truck for a construction theme b-day party. We borrowed a cake pan from the library for the Thomas cake. The kids played on the Thomas the train the whole time, we didn't even do games! We didn't even colour the train ornaments I picked up after Christmas on sale. I had made train lanterns for decoration with milk cartons painted black, cut two holes on one of the sides glued red and green tissue (left over from Christmas) to the inside, construction paper handle for the top (cut open the top of the carton). Use a flashlight or battery operated tealight inside. One for each child to take home.
From Stacy W.
Im a party planner and own my own themed birthday business for kids:)
1) the website oriental trading is a fantastic resource for supplys for decorations and goodie bags. Its my go to place
2) plan as far in advance as you can, im always hitting the clearance bins for wonderful finds at a fraction of the cost
3) we have a dollar tree's in kentucky that have colored plates cups napkins for $1! Some have themes on them also
4) the website birthday parties for kids is an excellent resource for mothers ideas that are brilliant and usually cheap
5) printing things off the computer is a time and money saver usually and can usually be personalized easier!
From JeanMarie E
I don't how well this would work now, seeing as most don't read the newspaper anymore but:
My parents (when we were little and didn't care) wrapped our gifts in newspaper, and told the guests to do the same. We were young and didn't really care what it was wrapped in as long as we could rip it off and have the gift inside.
From Gina D. R.
I did so many theme parties on low budgets for my kids... one that comes to mind was the Mermaid party, we had the girls bring their swimsuits to wear(this was in Jan), then we maid the mermaid flipper part out of black trash bags and had races with those on! Oh yes, the floor was covered in various shades of blue balloons for the water. I made seahorses, octopuses, used shells, strung steamers, etc. Also for the cake I found a pattern using a 13 x9 and a round pan and made a mermaid. oh yes, I made a treasure chest out of a Styrofoam ice chest, covered it in alum foil and used construction paper to make the belts , etc on the chest, we had party favors, necklaces, etc in the chest. Remember the girls having a wonderful time.
We had the cat theme one year, we painted the girls faces like cats, cat cake, we played push the ball of yarn across the floor with your nose, then found some rubber gold fish and put them in a large bowl and they bobbed for fish, I think we had goldfish snacks too.
From Shara L.
From Pat M. H.
The best birthday party I gave my son, when he turned 5 was in the park...lots to do and easy clean up....
From Heather O.
Make note books from printer paper and tie off with a ribbon. Also instead of buying crayons break a box up put two in each favor bag with the notebooks.
One more home made bubbles in little bottles from the dollar store or hobby lobby decorate with stickers or ribbon to match your theme.
Homemade play dough on bags, homemade chalk, design your own place mats sorry my mind runs.
Older kids can take pictures you print and put in frames they decorated
I buy wood frames for 99 cents at michaels.
From Nancy N. C.
Not sure it's a cost saver but, I guess so since it's definitely portion control ... I know it makes things a lot easier for serving: if you are serving cake and ice cream ... go with cupcakes and pre-scoop ice cream into extra cupcake liners (then set on a baking tray or similar in the freezer 'til time to serve) ... it makes it a lot faster / easier and neater to quickly serve a lot of folks ice cream and cake!
From Marissa M.
Children parties... you could do one child per age of your child... turning 6 equals 6 friends.. this opens your party options up as to where you can have them at without having your child's parents spring for that as well as a gift... Just a thought.
From Jennifer T. C.
This worked for me last year and I am actually having my son bday party today. I made a homemade cake, bought ice cream, a few frozen pizzas, and the boys are going to play outside. This was requested by my son both years. HE didn't want any special party like at the movies, bowling, chuck e cheese etc. All the presents are going to be wrapped in newspaper. Cheap? Maybe but he might remember just running around playing outside when he's older. The only bday parties I ever had as a child were cake and ice cream, presents wrapped in newspaper and family as the attendees.
From Kimberly H. P.
I make home made party decorations. I use napkins n the theme of choice & or posters to make home made piñata. I use a brown grocery bag fill it with McDonald toys & candy then cover it with the napkin or poster. I have a "Pepsi" sign used at a convenience store( the slick kind.) that I recycled and wrote Happy Birthday on the back. We have used that banner for 10 years & 2 kids. It was given to us - we just asked.
From Nicole R.
Kids Birthday parties can be expensive especially if you try to keep up with the Jones next door. So picking a theme that can be done a dime is key. So here a few for you:
1. Science Party- This can be really fun and really cheap. You can decorate your home like a mad scientist with old Halloween decorations. You can have the kids do experiments as games. This website has a ton of them and they usually require things you have right in your home. http://www.sciencekids.co.nz/experiments.html
2. Hero Party- Invite kids to dress as their favorite hero. Make a sign that says welcome to Super hero training camp. Have crafts to make their own masks. Make a bean bag toss hero themed and call it target practice. Take a cardboard box and make a photo booth. For weight lifting take a stick and tape really huge balloons on each end. Print some certificates that say they are officially a super hero.
https://www.facebook.com/LifeOnTheCheap101?ref=hl
From Crystal W-W N.
My daughter's princess party was in our backyard(no rental cost). I picked up a refrigerator box from a furniture store for free and decorated as a castle with my daughter with a draw bridge. Filled up our kiddy pool for water play and played hot potato Snow white style with a poison apple. For lute bags we made crowns out out bristol board and decorated them with sparkle glue and markers as well as decorated dollar store headbands with rhinostones from the dollar store. I made my one ice cream cake with oreo cookie crumb crust, chocolate sauce and ice cream. Our invitations were royal proclamations printed on my computer.
The pirate party we had a treasure hunting game with printed maps that we aged in the oven to find golden coins (chocolate).
For an adventure party, we set up a pup tent (ours was inside because my son's b-day is March) we made hobo loot bags (stick from a nature walk and piece of square material) homemade trail mix (nut free) and little flashlights from the dollar stores. The only thing we slurged on was having someone come in with pets (snakes, turtles, frogs and such to talk about and show the kids) each child got a picture of themselves with a pet as well.
Invites were written on construction paper cut into a leaf.
Barbie party- for the cake I have a large measuring bowl and used it to bake the cake in for barbie's skirt. Stuck one of my daughter's barbies (covered the legs with saran wrap) into the top of the cake and just decorated with icing (koolaid package works very well for icing colouring and flavour, has to be the one without sugar) . We made our own jewelry with beads and ribbon that each child could bring home as well as decorated barrettes from the dollar story. I like to be more crafty with the little thing the kids can bring home. I find the lout bag stuff can sometimes be cheaply made and a lot of money for what you pay for. Usually they last a week then into the garbage. A lot of waste. I would rather the kids be sent home with one thing they made as it is more meaningful and tends to be less likely that it will end up in the trash. The kids spend time making their prize to take home which cuts down on games and prizes as well (some games for parties are expensive especially themed ones).
Thomas the Train party- make shift train from free refridgerator box. ( always call a week in advance to the furniture store to ask for them to save me one). Smaller box for the front and just decorate. Can also work as a truck for a construction theme b-day party. We borrowed a cake pan from the library for the Thomas cake. The kids played on the Thomas the train the whole time, we didn't even do games! We didn't even colour the train ornaments I picked up after Christmas on sale. I had made train lanterns for decoration with milk cartons painted black, cut two holes on one of the sides glued red and green tissue (left over from Christmas) to the inside, construction paper handle for the top (cut open the top of the carton). Use a flashlight or battery operated tealight inside. One for each child to take home.
From Stacy W.
Im a party planner and own my own themed birthday business for kids:)
1) the website oriental trading is a fantastic resource for supplys for decorations and goodie bags. Its my go to place
2) plan as far in advance as you can, im always hitting the clearance bins for wonderful finds at a fraction of the cost
3) we have a dollar tree's in kentucky that have colored plates cups napkins for $1! Some have themes on them also
4) the website birthday parties for kids is an excellent resource for mothers ideas that are brilliant and usually cheap
5) printing things off the computer is a time and money saver usually and can usually be personalized easier!
From JeanMarie E
I don't how well this would work now, seeing as most don't read the newspaper anymore but:
My parents (when we were little and didn't care) wrapped our gifts in newspaper, and told the guests to do the same. We were young and didn't really care what it was wrapped in as long as we could rip it off and have the gift inside.
From Gina D. R.
I did so many theme parties on low budgets for my kids... one that comes to mind was the Mermaid party, we had the girls bring their swimsuits to wear(this was in Jan), then we maid the mermaid flipper part out of black trash bags and had races with those on! Oh yes, the floor was covered in various shades of blue balloons for the water. I made seahorses, octopuses, used shells, strung steamers, etc. Also for the cake I found a pattern using a 13 x9 and a round pan and made a mermaid. oh yes, I made a treasure chest out of a Styrofoam ice chest, covered it in alum foil and used construction paper to make the belts , etc on the chest, we had party favors, necklaces, etc in the chest. Remember the girls having a wonderful time.
We had the cat theme one year, we painted the girls faces like cats, cat cake, we played push the ball of yarn across the floor with your nose, then found some rubber gold fish and put them in a large bowl and they bobbed for fish, I think we had goldfish snacks too.
From Shara L.
From Pat M. H.
The best birthday party I gave my son, when he turned 5 was in the park...lots to do and easy clean up....
Subscribe to:
Posts (Atom)